
Water leakage may appear in different forms. Some problems are obvious, while others develop slowly inside the panels or ceiling structure.
Common signs include:
- Water pooling on the chiller room floor
- Dripping from the evaporator unit
- Water stains on ceiling panels or wall joints
- Ice buildup near the drain tray or air cooler
- Wet insulation panels
- Mold or bad odor around corners
- Condensation on the door frame
- Water dripping from refrigeration pipes
- Damaged floor coating or swollen wall panels
- Higher humidity inside the room
If the leakage appears repeatedly after cleaning, the problem is usually related to drainage, insulation, air infiltration, or refrigeration system operation.
Main Causes of Water Leakage in a Chiller Room
Water leakage does not always mean that a pipe is broken. In many cases, the water comes from condensation. Warm and humid air enters the cold room, touches cold surfaces, and turns into water droplets.
Common Water Leakage Causes and Solutions
| Leakage Cause | Common Location | Main Reason | Basic Solution |
| Blocked drain pipe | Evaporator / floor area | Dirt, ice, slime, or poor drainage slope | Clean and flush the drain pipe |
| Poor door sealing | Door frame / entrance | Warm air entering the room | Replace gasket and adjust door |
| Damaged insulation panel | Wall / ceiling / floor | Moisture enters panel joints | Repair or replace damaged panels |
| Evaporator drain tray problem | Under air cooler | Rust, wrong position, blockage | Clean, adjust, or replace drain tray |
| Excessive condensation | Ceiling, walls, pipes | High humidity or air leakage | Improve sealing and humidity control |
| Defrost system failure | Evaporator area | Ice melts unevenly or overflows | Check defrost heater, timer, and sensor |
| Refrigerant pipe sweating | Pipe surface | Missing or damaged pipe insulation | Re-insulate refrigeration pipes |
| Floor drainage issue | Room floor | Poor floor slope or blocked floor drain | Improve floor slope and drainage |
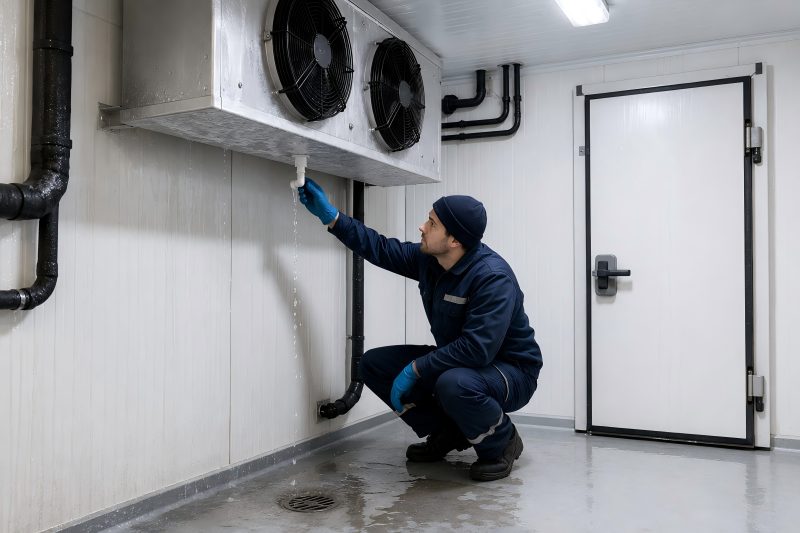
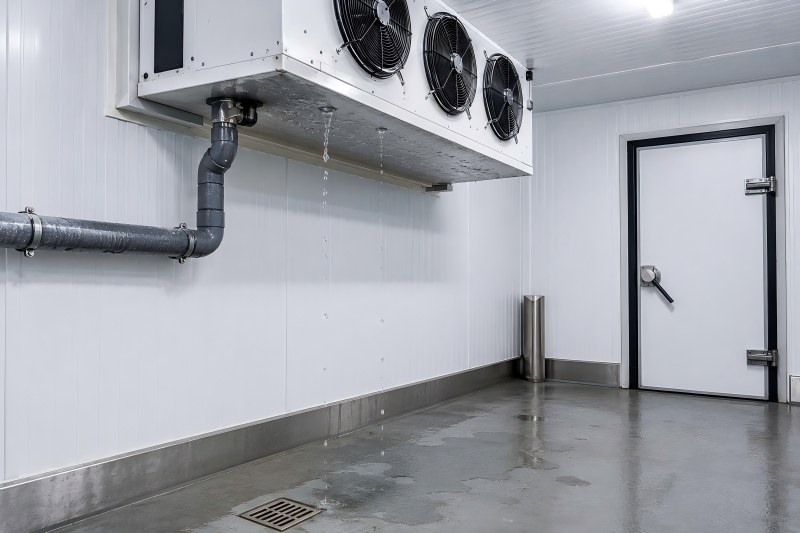
Check the Evaporator Drain System
The evaporator is one of the most common areas where chiller room water leakage occurs. Air moisture turns into water on the evaporator coil. This water should flow into the drain tray and then leave through the drain pipe.
If the drain pipe is blocked, frozen, or incorrectly installed, water may overflow and drip onto the floor.
Possible Problems
- Drain pipe blocked by dust, oil, food residue, or slime
- Drain pipe frozen due to low temperature
- Drain tray tilted in the wrong direction
- Drain pipe without enough slope
- Drain heater not working
- Drain outlet blocked outside the room
Solutions
First, turn off the unit safely and inspect the drain tray and drain pipe. Remove dirt, ice, and foreign materials. Flush the pipe with warm water or a proper cleaning solution. If the pipe freezes frequently, check whether the drain heater is working.
The drain pipe should have a proper downward slope so that water can flow out naturally. Avoid long horizontal pipe sections because they can easily hold water and freeze.
For low-temperature chiller rooms, insulated drain pipes and electric drain heaters are often necessary.
Inspect the Door Seal and Door Frame
A damaged door seal is another major cause of water leakage. When warm and humid air enters the chiller room, it quickly condenses on cold surfaces. This may cause water droplets around the door frame, floor entrance, ceiling area, or evaporator.
Common Door Problems
- Door gasket is cracked, aged, or loose
- Door cannot close tightly
- Door frame is deformed
- Door heater is not working
- Door is opened too frequently
- Strip curtain or air curtain is missing
- Floor near the entrance is wet due to air exchange
Solutions
Check whether the door closes smoothly and tightly. Check sealing by closing the door on paper and pulling it gently. If it slides out too easily, the sealing pressure may be weak.
Replace damaged door gaskets immediately. Adjust hinges, locks, and door closers if the door is not aligned. For busy chiller rooms, installing PVC strip curtains or an air curtain can reduce warm air entering the room.
If condensation appears around the door frame, check the door frame heater. A failed heater can cause sweating, dripping, or even ice formation.
Repair Damaged Insulation Panels
Insulation panels are essential for keeping a chiller room stable. If the panel joints, ceiling, wall corners, or floor connections are not sealed properly, warm air and moisture can enter the structure. Over time, this may cause internal condensation, panel swelling, water stains, mold, or structural damage.
Signs of Panel Leakage
- Water stains on wall or ceiling panels
- Soft or swollen panel surfaces
- Mold around panel joints
- Rust near metal panel edges
- Visible gaps between panels
- Water dripping from ceiling joints
- Higher refrigeration load
Solutions
Inspect all panel joints, corners, ceiling connections, and floor-wall junctions. Small gaps can be sealed with food-grade silicone sealant or suitable cold room sealant. Larger damage may require panel repair or replacement.
If water has entered the insulation core, simple surface sealing may not solve the problem. Wet insulation loses thermal performance and may continue causing condensation. In this case, replacing the damaged panel is usually the better solution.
Check the Defrost System
In a chiller room, the evaporator may need regular defrosting to remove ice buildup. If the defrost system fails, ice can block the drain tray or coil. When the ice melts, water may overflow and leak onto the floor.
Defrost-Related Leakage Problems
- Defrost cycle too long
- Defrost cycle too short
- Defrost heater failure
- Defrost sensor failure
- Drain pipe freezes after defrost
- Evaporator fan starts too early after defrost
- Excessive ice buildup on the coil
Solutions
Check the defrost timer, sensor, heater, and control settings. Make sure the system defrosts at the correct interval based on room temperature, product load, humidity, and door opening frequency.
After defrosting, the drain water must leave the tray smoothly. If water remains in the tray and freezes again, the drain system needs cleaning, heating, or better insulation.
Improve Pipe Insulation
Refrigeration pipes may produce water droplets when their insulation is damaged or missing. This occurs when humid air condenses on cold pipe surfaces.
Common Pipe Insulation Problems
- Insulation is cracked or loose
- Pipe joints are not sealed
- Insulation thickness is too thin
- Vapor barrier is damaged
- Pipe hanger areas are exposed
- Condensation forms under suction pipes
Solutions
Replace damaged insulation with proper closed-cell insulation materials. Tightly seal every joint to block moisture infiltration. Pay special attention to elbows, valves, pipe supports, and wall penetration areas.
For chiller rooms with high humidity, vapor barrier quality is very important. Poor pipe insulation can cause continuous dripping, ceiling stains, and energy loss.
Control Indoor Humidity and Air Infiltration
High humidity inside the chiller room increases condensation risk. Even if the refrigeration system is working, too much moisture can overload the evaporator and create water leakage problems.
Common Sources of Moisture
- Frequent door opening
- Wet products entering the room
- Uncovered liquid products
- Washing operations near the entrance
- Poor packaging
- Missing strip curtain
- Warm air leakage through panel joints
- Too many workers entering and leaving
Solutions
Reduce unnecessary door openings. Keep doors closed when loading and unloading are finished. Install PVC strip curtains, fast-action doors, or air curtains for high-traffic rooms.
Avoid bringing wet goods directly into the chiller room. If products are washed before storage, allow proper draining before moving them inside. For food and beverage facilities, improve workflow design to reduce moisture transfer.
Inspect the Floor and Drainage Design
Sometimes the leakage source is not the refrigeration system but the floor drainage design. Poor floor slope stops water from draining properly. This causes standing water and makes the room look like it has a leakage problem.
Floor-Related Problems
- Floor slope is too flat
- Floor drain is blocked
- Drain cover is clogged
- Floor coating is cracked
- Water enters panel base
- Poor sealing between floor and wall panels
Solutions
Clean floor drains regularly. Check whether water flows naturally toward the drainage point. If water remains in low areas, the floor slope may need correction.
Cracked floors should be repaired quickly because water can enter the insulation layer or concrete base. For food storage and processing areas, use hygienic, anti-slip, and waterproof flooring materials.
Step-by-Step Troubleshooting Guide
When solving water leakage in a chiller room, avoid repairing blindly. Use a step-by-step inspection method.
Chiller Room Water Leakage Troubleshooting Checklist
| Step | Inspection Area | What to Check | Action |
| 1 | Leakage location | Floor, ceiling, evaporator, door, pipes | Identify the main water source |
| 2 | Evaporator | Drain tray, coil, defrost, drain pipe | Clean and test drainage |
| 3 | Door area | Gasket, frame, hinge, heater | Replace or adjust sealing parts |
| 4 | Panels | Wall joints, ceiling joints, corners | Seal gaps or replace damaged panels |
| 5 | Pipes | Insulation, sweating, joints | Repair insulation and vapor barrier |
| 6 | Floor | Drainage slope, floor drain, coating | Clean drain and repair floor |
| 7 | Operation | Door opening, humidity, product loading | Improve daily management |
Preventive Maintenance Tips
Solving leakage once is not enough. A chiller room needs regular maintenance to prevent repeated problems.
Recommended maintenance actions include:
- Clean evaporator drain pipes monthly
- Inspect door gaskets regularly
- Check panel joints and sealant condition
- Clean evaporator coils and drain trays
- Test defrost system operation
- Inspect refrigeration pipe insulation
- Keep floor drains clean
- Avoid storing wet products without draining
- Reduce long door opening time
- Check for mold, odor, and water stains
- Maintain stable room temperature and humidity
- Schedule professional refrigeration inspection
Maintenance Frequency for Leakage Prevention
| Maintenance Item | Suggested Frequency | Purpose |
| Drain pipe cleaning | Monthly | Prevent blockage and overflow |
| Door gasket inspection | Monthly | Reduce warm air infiltration |
| Evaporator coil cleaning | Every 1–3 months | Improve heat exchange and drainage |
| Defrost system check | Every 3 months | Prevent ice buildup and overflow |
| Panel joint inspection | Every 3–6 months | Stop moisture entering insulation |
| Pipe insulation inspection | Every 3–6 months | Prevent pipe sweating |
| Full system inspection | Every 6–12 months | Improve long-term reliability |
When Should You Call a Professional Technician?
Some minor leakage problems can be solved by cleaning drains, replacing gaskets, or sealing small gaps. However, professional inspection is recommended when the problem is related to the refrigeration system, electrical components, or structural insulation.
Call a technician if:
- Water leakage keeps returning
- Evaporator ice buildup is severe
- Defrost system does not work properly
- Drain pipe freezes repeatedly
- Wall or ceiling panels are swollen
- Electrical parts are near the leakage area
- Refrigeration performance becomes unstable
- The room temperature cannot stay at the set point
- There is mold inside insulation panels
A professional technician can check refrigerant pressure, evaporator performance, defrost control, fan operation, drainage design, and insulation condition.
For quick troubleshooting, start with the evaporator drain system, door gasket, panel joints, pipe insulation, and floor drains. For long-term prevention, regular maintenance is essential. A well-maintained chiller room can reduce water leakage, improve temperature stability, protect stored products, lower energy costs, and extend the service life of refrigeration equipment.